I planned to make a cassoulet of chicken and dark beer yesterday, but I have so many leftovers in my fridge, I decided to push things back a day. Then I noticed the half a rotisserie chicken in the mix, and one word sprang into my mind: enchiladas.
That was it. Normally I would not make something like that for dinner, because tortillas are a must for enchiladas, and my husband tries to limit carbohydrates, especially corn and flour. But I decided he could choose to eat one of the two other choices if he didn't want echiladas, since once I thought the word, I knew I had to make 'em. It'd been so long that Bunny didn't remember me ever making them. Seriously, it'd been 5 years or more.
So anyway, homemade enchilada sauce is really easy, and I think tastes better than the canned stuff.
Take 1 14.5 ounce can of tomato sauce, put it in a small saucepan with 1/2 c beef broth (or you can use boullion and water). Add one minced onion and a pressed garlic clove. Then add 1/2 - 1 tsp chili powder (depending how spicy you and your family like things), 1/2 tsp cumin, and 1/4 tsp salt. Bring it to a bubble and let simmer until thickened a bit.
While the sauce is bubbling, shred a couple of cups of cooked chicken and grate a bunch of cheese. Heat the oven to 375F and heat a pan on the stove over med-hi. Add 1/2 grated onion and another clove garlic, and saute for a minute or less, then dump in the chicken and about 1/4 of the sauce... you want the mixture to be moist, but not drippy.
Spoon enough sauce into an oven proof dish that's oblong. In a pinch you can use a 13x9 pan, but I think these cook better if they're snugly fit in a casserole...the tortillas get dry easily. Then assemble your enchiladas. I put a flour tortilla on a plate and make what are probably more accurately mini burritos, since I fold them tightly at the ends. If you prefer corn, then go for it, but you probably need to warm them since those suckers are more brittle. With flour tortillas this recipe makes about 6. I put a tortilla on a plate, put about 1/2 c of the chicken mixture in the middle, top with a couple of Tbsp cheese, and fold. Then I put it, seam down, in the pan. Repeat, repeat... until everything is used up. They have to be kind of squished in. Top with remaining sauce, being careful to cover all the surfaces with some saucy goodness. Then sprinkle cheese all over and pop into the oven for about 20 minutes.
My daughter said if she had 20 thumbs, she'd give this recipe 20 thumbs up. My husband? He ate with gusto, but he also had left over black bean soup, because something in legumes actually inoculates a meal against the other carbohydrates as far as making your blood not go haywire with insulin production. (Within reason! You can't, say, eat a garbanzo bean, then gobble half a cake, sorry.)
Thursday, January 22, 2009
Tuesday, January 13, 2009
Bacon and Lentil Soup
I have a new crush. You know how sometimes you think you don't like something, but you realize you simply must have gotten a bad first impression, then you find you really do like it a lot? Well, I am <---this---> close to doodling Mrs. Kristianna Lentil in the margins of my cookbook. I actually owe it to the controversial Rachael Ray. I know, some people can't stand her, but I like her and I also get her magazine. I find at least a dozen recipes in there each month that I want to try. A couple of months ago there was a recipe for Garlicky Lentils that I decided to give a go. I always tell Bunny to keep giving foods a chance, and it's not just something I say. I mean it -- just because something has not been to my liking once, twice, or a hundred times, doesn't mean I might not like it *some* way.
Except for turnips. I promised my husband I'd stop trying to make him eat them, though I think they're a decent substitute for potatoes in some soups. Turnips, you're dead to us. He's working on me to similarly agree to no more Brussells sprouts, but I have not agreed to that.
So, anyway, LENTILS!
I made a soup last night that we all liked, except the 3 year old, and he doesn't like ANYthing, so he doesn't count. We'd live on Happy Meals if he planned the menus.
A week ago I saw a recipe for Bacon and Lentil soup, and seeing as I now like-like lentils, and we all love bacon here, it seemed like a natural fit for dinner.
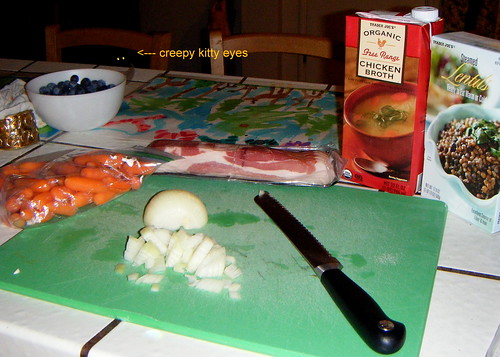
The ingredient list is very short, and it cooks up quickly if you begin with packaged lentils. Trader Joe's sells some great ones in the produce section, right by the beets I have unsuccessfully fed my family a couple of times. The blueberries in the photo are NOT in this soup--they're just out to encourage my kidlets to munch on them. Blueberries would probably rank right up there with all time ingredients I would not mix with lentils. *shudder!* ;) Oh, and yes, my poor cat was sitting outside hoping I'd let him in while I was cooking dinner. I didn't notice because the noise level in my house at about 6 p.m. is 300 decibles.
Anyway, this soup is fast and easy. I followed the recipe above pretty closely, except I removed all the bacon to drain on a paper towel, which kept it nice and crispy. Since I used precooked lentils, I didn't need to use quite as much stock. Also, I prefer soups to be thicker, so I gave the finished soup a whirl with an immersion blender before serving. I didn't puree it, but made it less brothy.
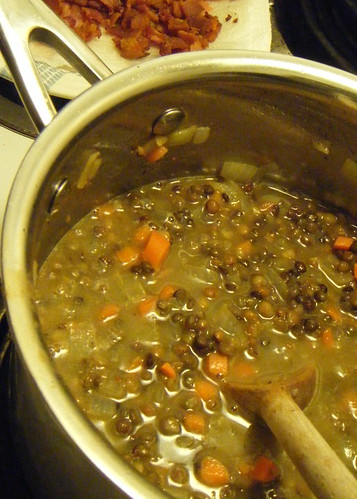
Here is the soup just before blending it in the pot. It could also go into a blender--say 1/3 of it--if you don't have an immersion blender. But I tell you, that is one kitchen tool I would not want to be without. I think I'd prefer to have it over an actual blender if I had to choose.
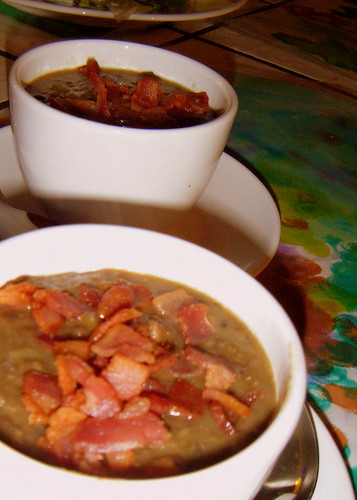
Top with reserved bacon, and some green onions if you remembered to put them on your grocery list. I didn't. ;)
Enjoy!
Except for turnips. I promised my husband I'd stop trying to make him eat them, though I think they're a decent substitute for potatoes in some soups. Turnips, you're dead to us. He's working on me to similarly agree to no more Brussells sprouts, but I have not agreed to that.
So, anyway, LENTILS!
I made a soup last night that we all liked, except the 3 year old, and he doesn't like ANYthing, so he doesn't count. We'd live on Happy Meals if he planned the menus.
A week ago I saw a recipe for Bacon and Lentil soup, and seeing as I now like-like lentils, and we all love bacon here, it seemed like a natural fit for dinner.
The ingredient list is very short, and it cooks up quickly if you begin with packaged lentils. Trader Joe's sells some great ones in the produce section, right by the beets I have unsuccessfully fed my family a couple of times. The blueberries in the photo are NOT in this soup--they're just out to encourage my kidlets to munch on them. Blueberries would probably rank right up there with all time ingredients I would not mix with lentils. *shudder!* ;) Oh, and yes, my poor cat was sitting outside hoping I'd let him in while I was cooking dinner. I didn't notice because the noise level in my house at about 6 p.m. is 300 decibles.
Anyway, this soup is fast and easy. I followed the recipe above pretty closely, except I removed all the bacon to drain on a paper towel, which kept it nice and crispy. Since I used precooked lentils, I didn't need to use quite as much stock. Also, I prefer soups to be thicker, so I gave the finished soup a whirl with an immersion blender before serving. I didn't puree it, but made it less brothy.
Here is the soup just before blending it in the pot. It could also go into a blender--say 1/3 of it--if you don't have an immersion blender. But I tell you, that is one kitchen tool I would not want to be without. I think I'd prefer to have it over an actual blender if I had to choose.
Top with reserved bacon, and some green onions if you remembered to put them on your grocery list. I didn't. ;)
Enjoy!
Thursday, January 1, 2009
New Year's Special
Hoppin' Johns
1 ham bone
1 can black eyes peas
1 cup rice
2 tbs. hot sauce
1 tbs. cumin
1 cup chicken broth
1 cup water
Place a ham bone, with meat still on, in a large pot.
Cover with enough water to submerge the bone, but not fully cover it.
Bring the water to a boil.
Reduce heat to a simmer and let the bone simmer for about an hour.
Remove the ham from the water and reduce the heat to medium low.
Remove the ham from the bone and chop up into little pieces.
Discard bone.
Drain and rinse the beans.
Add the beans, chopped ham and rice to the simmering ham broth.
Add chicken broth and stir.
Stir in hot sauce, cumin, kosher salt and garlic.
Cover and let simmer for 20 mins.
After 20 mins., add water if needed.
Cook until rice is tender.
Voila! Serve in a bowl with crusty bread on the side.
Wednesday, December 17, 2008
Handmade Paper Ornaments

This year, while there is the usual store bought stuff adorning our tree and being given to loved ones, we're trying to also take the time to do handmade gifts and adornments. Although I love her stuff, I am no Martha -- neither the time nor persnicketiness (is that a word? hope so!) to make about 99.999% of what I enjoy *looking* at in her magazine and on the shows. Here, to actually finish projects, we must stick with the more simple ones.
Simple does not have to mean ugly or poorly done, however. I am quite taken with these origami wreaths. There are so many astonishingly pretty papers in the scrapbook aisle these days (not that I scrapbook), so these can be made for pennies in any color one could desire. Last week Michael's had a huge sale and most of their papers were 25 cents each, and I figure that I can make 2-3 out of each sheet, even with a few strips given to the kids to make homemade bookmarks.
They're really pretty simple to make... probably harder to describe making!
A sturdy paper works best, since it will be necessary to manipulate it a bit without it creasing in unattractive ways.
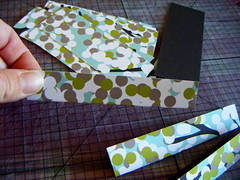

To begin, cut your paper into strips that are about 2 times as long as they are wide. You can make teensy wreaths or huge ones, but too small will be harder to fold precisely, and too large will be, well, too large! I chose 3" by 1.5". When you have all your strips cut, fold them in half lengthwise. If the pattern/colors you want to show are only on one side, you should fold so that the printed side is on the outside. If it's two sided paper, then you have a choice to make. :)
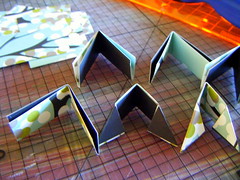
Once you have made the first fold, fold again bringing the short sides together. With the open edges up, bring in each corner at a 45 degree angle. The photo above shows the second fold to the left, then the angled folds to the right.. You need to make 8 of these puppies to complete an entire wreath.
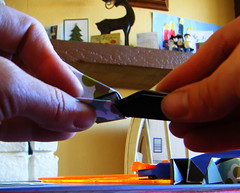
Once you have your little pointy pieces ready to go, it's time to make a wreath! If you look at the open edge of one segment, each half has one little pocket in it. Insert the pointed edges of another piece, one into each 'pocket'.
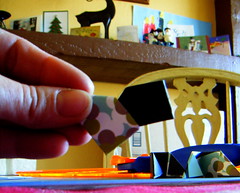
Now you have two little pockets in the piece to the right.

Keep on keepin' on, and insert more segments in the same way you did before, working around in a counter-clockwise manner. After the eighth piece is in place, you need to wiggle everything around to stick the tip of your first piece into it, making a circular wreath. Since it's only paper, and you're not using any glue, there's a fair amount of give.
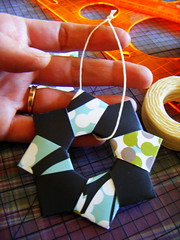 To hang the ornament, you can just loop some twine, like I did, or you might want to be fancier and poke a hole through one triangle tip. Either way, I think they're darling. :)
Monday, November 3, 2008
Why didn't I think of this sooner?
Sometimes in life we avoid thinking of simple ideas mostly because we are moving quickly to slow down and think about what we're doing, only to discover that when we do slow down, simple solutions are right before our eyes.
I love to buy fresh herbs from the grocery store. I don't have an herb garden; my patio lacks the space and our current situation prevents us from buying a house with gardening space any time soon. So I buy fresh herbs when recipes call for it. The upside: tasty herbs bursting with flavor when added to a recipe. Downside: not using all of the herbs in the recipe, and said leftovers go into the veggie drawer, only to rot away.
Ah ha! solution: take the remaining herbs and leave them out to dry. Once they are completely dried, you can remove the leaves from the stems fairly easily (I used Rosemary and just pulled in the opposite direction of the growth), place them in a bag, and voila! No need to go to the store to buy jarred spices, which can be ridiculously expensive for what you are really buying.
Yes, I know. Why didn't I think of this sooner?
Thursday, October 9, 2008
Parmesan Chicken Piccata
Parmesan Chicken is one of those easy dishes that only seems complicated. I love it when not much work translates into great results and happy bellies. It's great with a simple side of pasta with marinara, but only a few ingredients transforms the dish into Parmesan Chicken Piccata.

You need to have everything prepped in advance, then it all comes together quickly. Here we have beaten eggs and parmesan in separate dishes for dredging the chicken, which will be pounded to about 1/4 inch thickness. Angel hair will be cooked separately, then tossed in the sauce, which consists of chicken broth, lemon slices, lemon juice, capers, and parsley. I tossed a couple of handfuls of tomatoes in to make it a one dish meal for me and the kids, and 'meat and salad' for my no-pasta eating hubby.

I like to pound meat in a gallon ziplock bag. Especially with chicken, it's nice to avoid getting eensy droplets of germy juiciness all over the place, since I never know when a toddler may decide he needs to crawl up onto the counter to steal a sip of my soda, like he did last night.
Cook the pasta al dente, reserve a half cup or so of the liquid, then drain the pasta and set aside for later. I like to toss the noodles with a little olive oil so it doesn't clump together later.

After pounding thin, salt and pepper the meat, and dip each piece first in egg, then parmesan to coat. Heat 2 T olive oil in a pan over medium heat and cook the chicken until deeply golden. Since chicken breasts can pound out to be really large, I cut some of them in halves before dredging to make them a fit in the pan more easily and had to work in batches.
Remove the chicken and set aside, covered in foil.

Add one more tablespoon olive oil to the pan, and saute the lemon slices, capers, parsely, and some chopped garlic. If like me, you realize your garlic has gone to the dark side, substitute garlic powder and update your grocery list. :)
After a couple of minutes add 1/2 cup chicken stock, or if you have it, 1/2 c white wine. Let it cook down and then add 1/2 chicken stock. Stir for one minute, then add the juice of one lemon and a tablespoon of butter, just to melt it. Here I added the tomatoes, since I wanted them to still have some 'snap' to them.


Add that pasta water you reserved, and then toss in the pasta to coat.

Mangia! Personally I think the lemons are not to be eaten. I tried it once, and it's YIKCY. But they do add flavor to the dish, and look pretty. :)
You need to have everything prepped in advance, then it all comes together quickly. Here we have beaten eggs and parmesan in separate dishes for dredging the chicken, which will be pounded to about 1/4 inch thickness. Angel hair will be cooked separately, then tossed in the sauce, which consists of chicken broth, lemon slices, lemon juice, capers, and parsley. I tossed a couple of handfuls of tomatoes in to make it a one dish meal for me and the kids, and 'meat and salad' for my no-pasta eating hubby.
I like to pound meat in a gallon ziplock bag. Especially with chicken, it's nice to avoid getting eensy droplets of germy juiciness all over the place, since I never know when a toddler may decide he needs to crawl up onto the counter to steal a sip of my soda, like he did last night.
Cook the pasta al dente, reserve a half cup or so of the liquid, then drain the pasta and set aside for later. I like to toss the noodles with a little olive oil so it doesn't clump together later.
After pounding thin, salt and pepper the meat, and dip each piece first in egg, then parmesan to coat. Heat 2 T olive oil in a pan over medium heat and cook the chicken until deeply golden. Since chicken breasts can pound out to be really large, I cut some of them in halves before dredging to make them a fit in the pan more easily and had to work in batches.
Remove the chicken and set aside, covered in foil.
Add one more tablespoon olive oil to the pan, and saute the lemon slices, capers, parsely, and some chopped garlic. If like me, you realize your garlic has gone to the dark side, substitute garlic powder and update your grocery list. :)
After a couple of minutes add 1/2 cup chicken stock, or if you have it, 1/2 c white wine. Let it cook down and then add 1/2 chicken stock. Stir for one minute, then add the juice of one lemon and a tablespoon of butter, just to melt it. Here I added the tomatoes, since I wanted them to still have some 'snap' to them.
Add that pasta water you reserved, and then toss in the pasta to coat.
Mangia! Personally I think the lemons are not to be eaten. I tried it once, and it's YIKCY. But they do add flavor to the dish, and look pretty. :)
Saturday, October 4, 2008
Getting Started
As I read through our previous posts, I am left thinking about those who aspire to decorate, but when they look in those glossy mags and see these bountiful tables spreads and gorgeous candle displays, they are left thinking, "Yeah, right. When will I have time to do this, and how much will of this cost?" So here are a few tips to those just trying to do a little bit of decorating without breaking the bank.
As with a wardrobe, start off with your basics. In decorating, I consider basics to be candles, candleholders and vases. To capture the vibe of the season, go to Michael's and get a scented candle that fits your idea of what the season means to you. Their candles are great, and they are cheap. Yes, they are made in China, but so are the majority of candles sold in the US. For candleholders, I prefer simple glass bases, to start. Once you have the basics, you can build onto that. Also, if you go into the wreath decorating section of Michael's, they have little add-ons that you can use to decorate candles. Have fun!
When you are on your weekly stop to Target, stop the Dollar Spot! I can often find items that will fit in perfectly for the season, and only cost $1-$2.50. Just this past week I found a great cornucopia to place on the table for Thanksgiving. Cost: $1.00. It doesn't have to cost a lot to look good.
As I said before, decorating doesn't have to mean spending a ton of money. It just means taking your time to build a repertoire, and to do that, you have to start off with the basics!
Subscribe to:
Posts (Atom)