Wednesday, December 17, 2008

Handmade Paper Ornaments


This year, while there is the usual store bought stuff adorning our tree and being given to loved ones, we're trying to also take the time to do handmade gifts and adornments. Although I love her stuff, I am no Martha -- neither the time nor persnicketiness (is that a word? hope so!) to make about 99.999% of what I enjoy *looking* at in her magazine and on the shows. Here, to actually finish projects, we must stick with the more simple ones.

Simple does not have to mean ugly or poorly done, however. I am quite taken with these origami wreaths. There are so many astonishingly pretty papers in the scrapbook aisle these days (not that I scrapbook), so these can be made for pennies in any color one could desire. Last week Michael's had a huge sale and most of their papers were 25 cents each, and I figure that I can make 2-3 out of each sheet, even with a few strips given to the kids to make homemade bookmarks.

They're really pretty simple to make... probably harder to describe making!

A sturdy paper works best, since it will be necessary to manipulate it a bit without it creasing in unattractive ways.
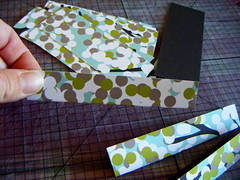

To begin, cut your paper into strips that are about 2 times as long as they are wide. You can make teensy wreaths or huge ones, but too small will be harder to fold precisely, and too large will be, well, too large! I chose 3" by 1.5". When you have all your strips cut, fold them in half lengthwise. If the pattern/colors you want to show are only on one side, you should fold so that the printed side is on the outside. If it's two sided paper, then you have a choice to make. :)
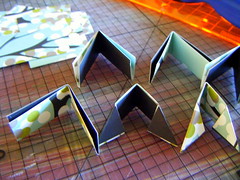

Once you have made the first fold, fold again bringing the short sides together. With the open edges up, bring in each corner at a 45 degree angle. The photo above shows the second fold to the left, then the angled folds to the right.. You need to make 8 of these puppies to complete an entire wreath.
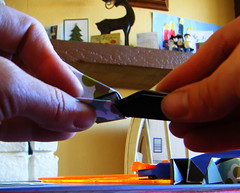

Once you have your little pointy pieces ready to go, it's time to make a wreath! If you look at the open edge of one segment, each half has one little pocket in it. Insert the pointed edges of another piece, one into each 'pocket'.
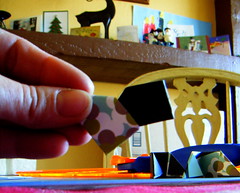

Now you have two little pockets in the piece to the right.


Keep on keepin' on, and insert more segments in the same way you did before, working around in a counter-clockwise manner. After the eighth piece is in place, you need to wiggle everything around to stick the tip of your first piece into it, making a circular wreath. Since it's only paper, and you're not using any glue, there's a fair amount of give.
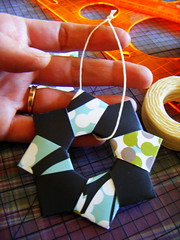
To hang the ornament, you can just loop some twine, like I did, or you might want to be fancier and poke a hole through one triangle tip. Either way, I think they're darling. :)

Monday, November 3, 2008

Why didn't I think of this sooner?

Sometimes in life we avoid thinking of simple ideas mostly because we are moving quickly to slow down and think about what we're doing, only to discover that when we do slow down, simple solutions are right before our eyes. 

I love to buy fresh herbs from the grocery store. I don't have an herb garden; my patio lacks the space and our current situation prevents us from buying a house with gardening space any time soon. So I buy fresh herbs when recipes call for it. The upside: tasty herbs bursting with flavor when added to a recipe. Downside: not using all of the herbs in the recipe, and said leftovers go into the veggie drawer, only to rot away.

Ah ha! solution: take the remaining herbs and leave them out to dry. Once they are completely dried, you can remove the leaves from the stems fairly easily (I used Rosemary and just pulled in the opposite direction of the growth), place them in a bag, and voila! No need to go to the store to buy jarred spices, which can be ridiculously expensive for what you are really buying.

Yes, I know. Why didn't I think of this sooner?

Thursday, October 9, 2008

Parmesan Chicken Piccata

Parmesan Chicken is one of those easy dishes that only seems complicated. I love it when not much work translates into great results and happy bellies. It's great with a simple side of pasta with marinara, but only a few ingredients transforms the dish into Parmesan Chicken Piccata.


You need to have everything prepped in advance, then it all comes together quickly. Here we have beaten eggs and parmesan in separate dishes for dredging the chicken, which will be pounded to about 1/4 inch thickness. Angel hair will be cooked separately, then tossed in the sauce, which consists of chicken broth, lemon slices, lemon juice, capers, and parsley. I tossed a couple of handfuls of tomatoes in to make it a one dish meal for me and the kids, and 'meat and salad' for my no-pasta eating hubby.


I like to pound meat in a gallon ziplock bag. Especially with chicken, it's nice to avoid getting eensy droplets of germy juiciness all over the place, since I never know when a toddler may decide he needs to crawl up onto the counter to steal a sip of my soda, like he did last night.

Cook the pasta al dente, reserve a half cup or so of the liquid, then drain the pasta and set aside for later. I like to toss the noodles with a little olive oil so it doesn't clump together later.


After pounding thin, salt and pepper the meat, and dip each piece first in egg, then parmesan to coat. Heat 2 T olive oil in a pan over medium heat and cook the chicken until deeply golden. Since chicken breasts can pound out to be really large, I cut some of them in halves before dredging to make them a fit in the pan more easily and had to work in batches.

Remove the chicken and set aside, covered in foil.


Add one more tablespoon olive oil to the pan, and saute the lemon slices, capers, parsely, and some chopped garlic. If like me, you realize your garlic has gone to the dark side, substitute garlic powder and update your grocery list. :)

After a couple of minutes add 1/2 cup chicken stock, or if you have it, 1/2 c white wine. Let it cook down and then add 1/2 chicken stock. Stir for one minute, then add the juice of one lemon and a tablespoon of butter, just to melt it. Here I added the tomatoes, since I wanted them to still have some 'snap' to them.


Add that pasta water you reserved, and then toss in the pasta to coat.


Mangia! Personally I think the lemons are not to be eaten. I tried it once, and it's YIKCY. But they do add flavor to the dish, and look pretty. :)

Saturday, October 4, 2008

Getting Started

As I read through our previous posts, I am left thinking about those who aspire to decorate, but when they look in those glossy mags and see these bountiful tables spreads and gorgeous candle displays, they are left thinking, "Yeah, right. When will I have time to do this, and how much will of this cost?" So here are a few tips to those just trying to do a little bit of decorating without breaking the bank.

As with a wardrobe, start off with your basics. In decorating, I consider basics to be candles, candleholders and vases. To capture the vibe of the season, go to Michael's and get a scented candle that fits your idea of what the season means to you. Their candles are great, and they are cheap. Yes, they are made in China, but so are the majority of candles sold in the US. For candleholders, I prefer simple glass bases, to start. Once you have the basics, you can build onto that. Also, if you go into the wreath decorating section of Michael's, they have little add-ons that you can use to decorate candles. Have fun! 

When you are on your weekly stop to Target, stop the Dollar Spot! I can often find items that will fit in perfectly for the season, and only cost $1-$2.50. Just this past week I found a great cornucopia to place on the table for Thanksgiving. Cost: $1.00. It doesn't have to cost a lot to look good.

As I said before, decorating doesn't have to mean spending a ton of money. It just means taking your time to build a repertoire, and to do that, you have to start off with the basics!


Simple Holiday Tabletop

With small kids underfoot and into everything, decorating for holidays can be challenging. I think for Halloween, it can be doubly so. You have to keep things reasonably safe and out of reach, while also being fun and NOT scary. Age 6, 3, or 0, no one needs images of the grim reaper creeping into their subconscious. Plus, this is a home, not the Haunted Mansion.

Thankfully it's easy to go the 'happy/silly' path with Halloween, so here we stick to the more cheerful ideas. For a few practical reasons, I choose to contain the decorating mainly to the 'landing strip/launch pad' area by the front door and the front steps.


Decorating festively does not have to be an outrageous expense. I have been slowly collecting items I love for the past 5 or 6 years, one or two things per year.


Here we have two votive holders, which I collected in pairs. The 'mummy head' pillars were $2 or so each from Big Lots and the only pieces I brought into our home last year. Our kids and their friends love 'em! Ditto for the spiders, which probably were $2-3 each from World Market.


Add in a few vintage cards given by friends over time, and a happy painted tin pumpkin that was part of a party favor, and we have a happy little nook that celebrates the holiday in a rather understated way.

Sunday, September 28, 2008

Pumpkins abound in CA


Lilly and Bunny in Patch
Originally uploaded by Kristianna
This is a pumpkin patch in CA.

A little bit of Fall


I can't claim that this is the best picture I've taken, but I think you can get the point. The biggest point is that you don't have to spend a ton of money on decorating your house for fall.  

In this little pic I have faux flowers from Pier 1, purchased about 8 years ago for a total of $5. I like them b/c they are the colors of fall, and yes, even though they are fake (gasp!), they have held up well for instant color. The leaves are real leaves that have been preserved. I got these at Michael's about three years ago, and once again, they have held up well. The vase is a simple glass vase (I like clear glass as it draws your focus to what's in the vase, and not to what is on the vase) from Pier 1, for about $20, purchased 8 years ago. 

I keep all of my seasonal items in a closet on a top shelf so that they aren't destroyed when they are not in use. 

Like I said, not the best pic., but just an idea. :)

Saturday, September 27, 2008

Pasta Carbonara alla Mia

While I was waiting for the September Daring Bakers Challenge dough to rise (see post on my blog for more), it was lunch time. Earlier this week, I saw a recipe for Pasta Carbonara that was the stuff of dreams. Actually, a friend of mine who also saw the recipe claimed she did dream about it...

Anyway, with 90 minutes to kill waiting for yeast to do its thing, I had my chance (and a willing partner to share a pasta meal, since it's the weekend and my daughter was home for lunch).

You can see the inspiration recipe in all its technicolor glory HERE, but I, of course had to make some changes. I rarely make a recipe as is... it's some personal problem of mine, I am sure.

I halved the recipe, and decided to add more veggies.

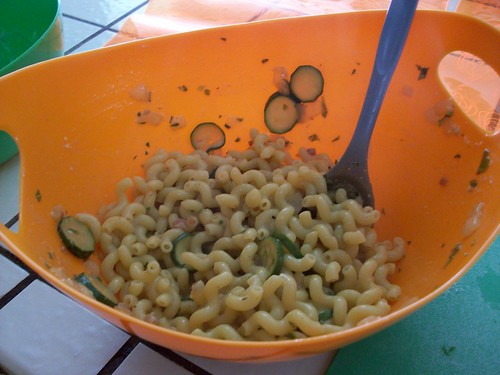
Here's what I used: a couple of eggs, a zucchini, some onion and garlic, diced pancetta, chicken stock, parmesan, peas, and pasta. My recipe really only vaires from the original in using the pancetta (and some olive oil instead of the bacon fat), and I sauteed zucchini slices with the onions.


My daugher abhors peas, so I held off adding them until the very last moment, after serving her portion.


But, jokes on her! She loved it so much that she ended up helping herself to a second serving... with peas.


She asked me to make it 'a bunch more times, please,' so I call that a kid seal of approval. It got my thumbs up, too. And, it really is a simple meal. I'd always been apprehensive of Carbonara, what with the raw eggs, but really, it was amazingly easy. Much thanks to the original recipe with its wonderful photos that ennerved me to try this.

Tuesday, September 23, 2008

Welcome Home

This blog is my and my sister's blog about home living. On this blog, look for posts about home decorating ideas (mine) and cooking ideas (my sister's). I am also hoping to post about good deals I find while shopping at my favorite stores!